Mocks for microservice environments
Configuration Syntax
Mockintosh supports JSON and YAML formats for the mock server configuration file.
The most important entities in the config file are: Service, Endpoint, Response:
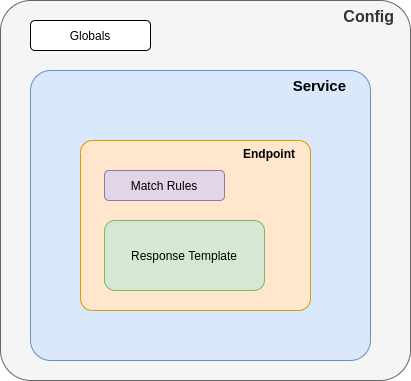
There are two main aspects of endpoint configuration: matching and templating. Matching defines how to recognize request and pick the corresponding response template. Templating gives capabilities to configure different response fields, and also make responses to be dynamic.
Note: There is a JSONSchema of configuration syntax that is used to validate all configuration files. You can use that as a formal source of configuration syntax.
Defining Services
When defining services, the key property is port, which defines on which port the server will be available to
requests. It is also a good practice to specify name property, which is just piece of string. You can configure one or
multiple services at once. Here’s a minimalistic working example:
services:
  - name: Catalogue API
    port: 8001
    endpoints:
      - path: /
  - name: Cart API
    port: 8002
    endpoints:
      - path: /
You can additionally specify hostname property to make service only respond to requests that contain specific Host
HTTP header:
services:
  - name: I'm like Google
    port: 8001
    hostname: www.google.com
    endpoints:
      - path: /
Note: There is special MOCKINTOSH_FORCE_PORT environment variable that allows to force all services to have certain
port (same for all) listened. This is meant for advanced use when “pick service by name” feature is used (
see here).
SSL Support
Enabling SSL for service is as easy as specifying ssl: true for it:
services:
  - name: This requires 'https://' to be used by a client
    port: 443
    ssl: true
If you want to use SSL-enabled mock inside browser (or other client), you would need to add Mockintosh’s self-signed certificate into trusted store.
In case you want Mockintosh to use your SSL certificate and key, just provide it as below:
services:
  - name: This requires 'https://' to be used by a client
    port: 443
    ssl: true
    sslCertFile: path/to/cert.crt
    sslKeyFile: path/to/cert.key
Multiple Services on Same Port (Virtual Hosts)
You can also serve multiple services from the same port number, if you provide them with different hostnames. This is handy when you serve multiple microservice mocks from single container:
services:
  - name: "First service"
    hostname: "service1.example.com"
    port: 80
  - name: "Second service"
    hostname: "service2.example.com"
    port: 80
Fallback To
Service-level defined fallbackTo: "http://example.com/" option redirects every unhandled request to the
specified base URL. e.g. for a path like /somepath the request would be redirected to http://example.com/somepath.
The redirect in here does not mean returning 3xx but instead doing a server-side request and tunneling its
response to the original requester. Such that the response of http://localhost:8001/somepath reflects
the response of http://example.com/somepath.
Note: Timeout for such redirected requests is 30 seconds (504) and can be overridden with MOCKINTOSH_FALLBACK_TO_TIMEOUT environment variable.
Note: If the hostname in fallbackTo is an unresolved name then 502 will be returned.
If the management API is enabled, redirected requests are also logged as unhandled requests.
Note: You may want to play with your client’s /etc/hosts file contents when using virtual hosts.
Defining Endpoints
Endpoint is the main configuration entity of Mockintosh. Each service holds a list of endpoints, and uses that list for matching to requests. Once request is matched, the corresponding response is evaluated and returned.
Here is the full list of properties for endpoint configuration:
idandcommentare just contextual metadata, thoughidis added to each response asx-mockintosh-endpoint-idheaderpath,method,queryString,headersandbodyare fields used for matching, see dedicated page for more details on thatresponseis used to hold response specification, can be simple string, file reference or detailed response specificationmultiResponsesLoopedis used to control looping of multiple variants ofresponse, see dedicated section belowdatasetanddatasetLoopedare used to configure datasets for dynamic responses
The response fields are described in detail in templating page, below is the quick list:
statusto control HTTP response codeheadersto specify headers as key-value pairsbodyas string or file referenceuseTemplatingfor the ability to disable template evaluating on response pieces
Here is config example with illustrations of several variants of endpoint definition:
services:
  - port: 8000
    endpoints:
      - path: /  # by default, method is GET, response is HTTP 200 with empty body

      - path: /api/action1
        method: "POST"
        response: "Simple string response" # can be just response content string

      - path: /api/action2
        response: # detailed specification allows controling status code and headers
          status: 201
          body: '@subdir/response.json'
          headers:
            Content-Type: application/json
Note: Apart from numeric HTTP status codes, RST and FIN special values can be set in the status field to simulate
the behavior of sudden TCP connection reset or close.
Multiple Responses
The response field under endpoint can be an array, too. If this field is an array then for each request the next
item is taken for response. For example, considering the configuration below:
response:
  - "@index.html"
  - headers:
      content-type: image/png
    body: "@subdir/image.png"
  - just some text
- request:
index.htmlfile is returned withContent-Type: text/htmlheader. - request:
subdir/image.pngimage is returned withContent-Type: image/pngheader. - request:
just some textis returned withContent-Type: text/htmlheader. - request:
index.htmlagain and so on…
The looping can be disabled with setting multiResponsesLooped to false, in this case you will start getting HTTP 410
response after all items in response list are exhausted.
Tagged Responses
As part of advanced usage of Mockintosh, you can specify tag field on each of multi-response items.
If tag is specified, the response is only considered if corresponding tag is set as
“current” via current tag. Responses without tag attribute are always selected.
Here’s the example:
services:
  - port: 8000
    endpoints:
      - path: /some/path
        response:
          - tag: success-case
            status: 200
            body: Me working
          - tag: failure-case
            status: 503
            body: simulated outage
Datasets
One can put a dataset field under endpoint to specify a list of key-value combinations to inject into response
templating.
This field can be a string that starts with @ to indicate a path to an external JSON file like @subdir/dataset.json
or an array:
dataset:
  - var1: val1
  - var1: val2
response: 'dataset: {{var1}}'
This dataset is looped just like how Multiple responses are looped:
- request:
dataset: val1is returned. - request:
dataset: val2is returned. - request:
dataset: val1is returned.
The looping can be disabled with setting datasetLooped to false. In this case, on 3rd request, the endpoint
returns 410 status code with an empty response body.
Global Settings
Under the globals section of config, you can specify headers that will be set for each response:
globals:
  headers:
    X-Tenant-Id: "test-tenant"
    Content-Type: application/json
Automatic CORS (Cross-Origin Resource Sharing)
Mockintosh serves CORS pre-flight requests automatically for all defined endpoints, unless there is existing OPTIONS
method endpoint in service configuration. The mock server will respond to such pre-flight requests with 204 status
code.
For any request that has Origin header provided, the mock server will set Origin and Access-Control-Allow-Headers
headers in the response according to the Origin and Access-Control-Request-Headers in the request headers. It will
also set Access-Control-Allow-Methods header to DELETE, GET, HEAD, OPTIONS, PATCH, POST, PUT.
Advanced Templating with Jinja2
You can specifiy the templating engine on top of the file like templatingEngine: "Jinja2" or inside the response.
A response example that leverages Jinja2 templating and Faker is shown below:
{
  "users": [{% for n in range(request.queryString.total) %}
    {
      "id": {{ random.int(10000, 100000) }},
      "firstName": "{{ fake.first_name() }}",
      "lastName": "{{ fake.last_name() }}",
      "friends": [{% for n in range(range(5) | random) %}
        {
          "id": "{{ random.uuid4() }}"
        }{% if not loop.last %},{% endif %}
      {% endfor %}]
    }{% if not loop.last %},{% endif %}
  {% endfor %}],
  "total": {{ request.queryString.total }}
}
Performance/Chaos Profiles
It’s possible to define probabilistic performance profiles at the global-level to simulate server-side outages, response delays or errors. Suppose you have these performance profiles:
performanceProfiles:
  profile1:
    ratio: 1
    delay: 1.5
    faults:
      '200': 0.3
      '201': 0.1
      '400': 0.1
      '500': 0.2
      '503': 0.1
      PASS: 0.4
      RST: 0.2
      FIN: 0.1
  profile2:
    ratio: 0.3
    delay: 4.8
ratio: probablity of performance profile trigger to happen; ranges from 0.0 to 1.0.
delay: reponse delay of the server in seconds.
faults: probabilistic distribution of response status codes, reset connections (RST), close connections (FIN) and
default status codes (PASS means ignore the fault)
A performance profile can be applied to a service, an endpoint or globally (in globals section)
like: performanceProfile: profile1. performanceProfile field overrides the parent settings.
Such that; service-level performance profile overrides the global-level, endpoint-level performance profile
overrides both the service-level and global-level performance profiles.
If you pick profile1 for your service:
- With 100% probability a 1.5 seconds delay will be added to all responses for the endpoints under that service.
- With ~20% probability the responses will have
200status code. - With ~6% probability the responses will have
201status code. - With ~6% probability the responses will have
400status code. - With ~13% probability the responses will have
500status code. - With ~6% probability the responses will have
503status code. - With ~26% probability the responses will have the default status code determined by the endpoint config.
- With ~13% probability the connections will be resetted.
- With ~6% probability the connections will be closed.
If you pick profile2 for your endpoint:
- With 30% probability a 4.8 seconds delay will be added to all responses of that endpoint.
- With 100% probability the responses will have the default status code determined by the endpoint config
(since there is no
faultsfield present).